

In this tutorial, we are setting up AWS s3 for your Django static and media files. So we can store static files and upload media files more effective manner. Django settings up is the best way that I found to set up
All over the world developers highly recommend AWS. Using AWS s3 for Django static files is a really good way to serve and be more flexible. When the user comes to a website, static files are better loaded for the user. Also, AWS s3 has a lot of good reasons.
So it’s a two-part setup…
- Aws and s3 setup
- Django setup
Aws and s3 setup
01. Login aws or Create an account here
02. Create aws user credentials
- Go to IAM service and create a user with programming access

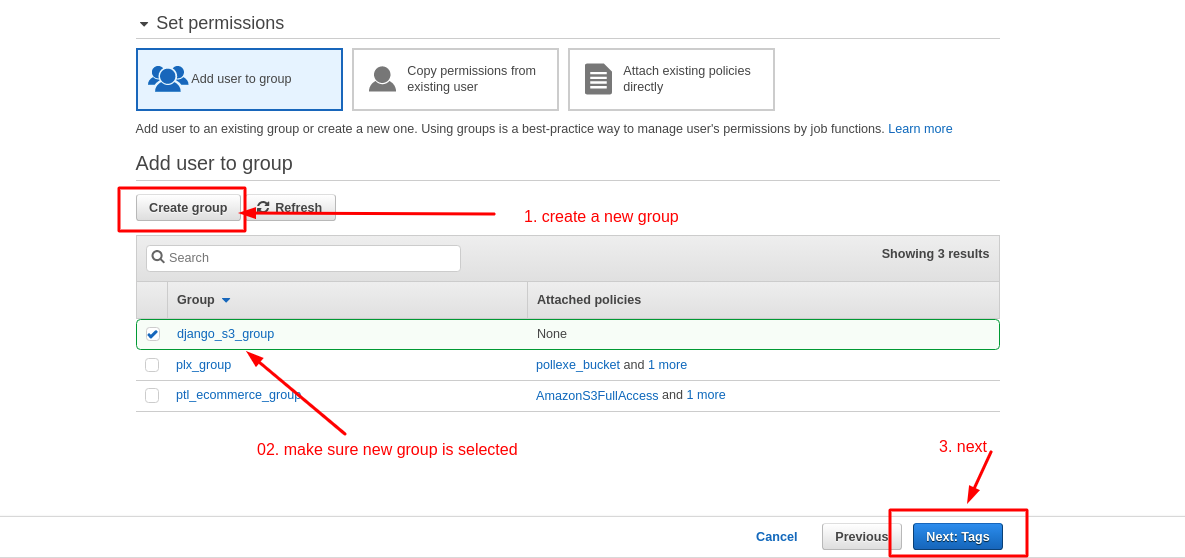
- Now create a new group

- Skip next steps of add user in aws and complete create user
- The note access key and secret key as that are needed for future steps Or download to store key for backup. that will be used as
AWS_SECRET_ACCESS_KEY = "AKIA6IVWV2ZUUJEZGCLK" AWS_ACCESS_KEY_ID = "R5wkbHaPjCewwAFiffT26m1SgStiJ7ziHtRX3HgD"


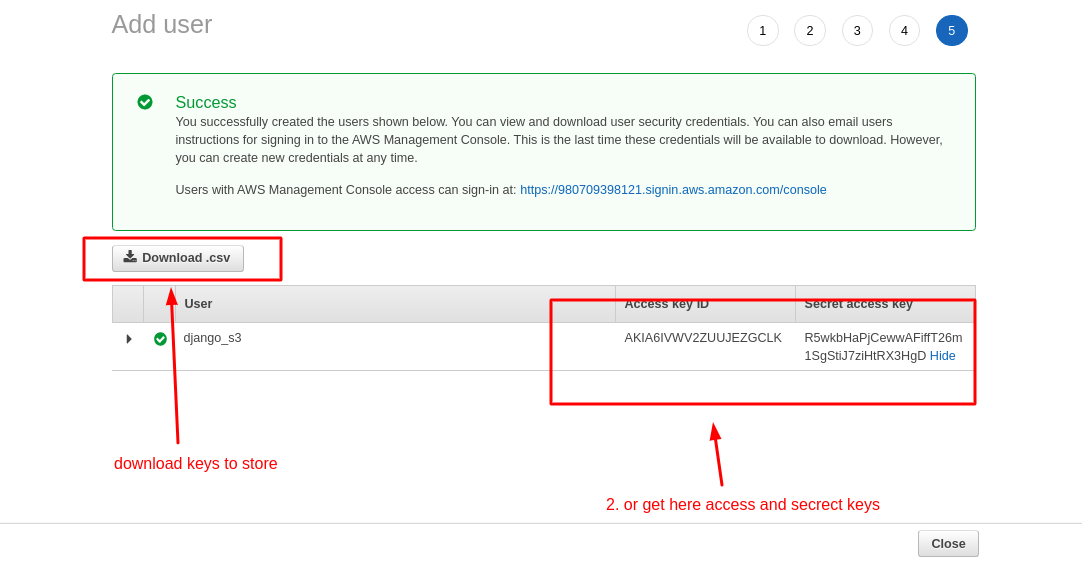
Note: this AWS user, access, secret keys will be removed after publishing this article for AWS safety security.
03. Create new S3 Bucket
01. Go to s3 service and create a bucket. it’s important to choose your region name. Aws s3 is fast but Closes region visitors will browse faster. So if you have a large-scale application, it’s a matter to choose a bucket region.
Note: if you want to create the same name bucket that I was created or another developer created, you will fail because you can’t create the same name bucket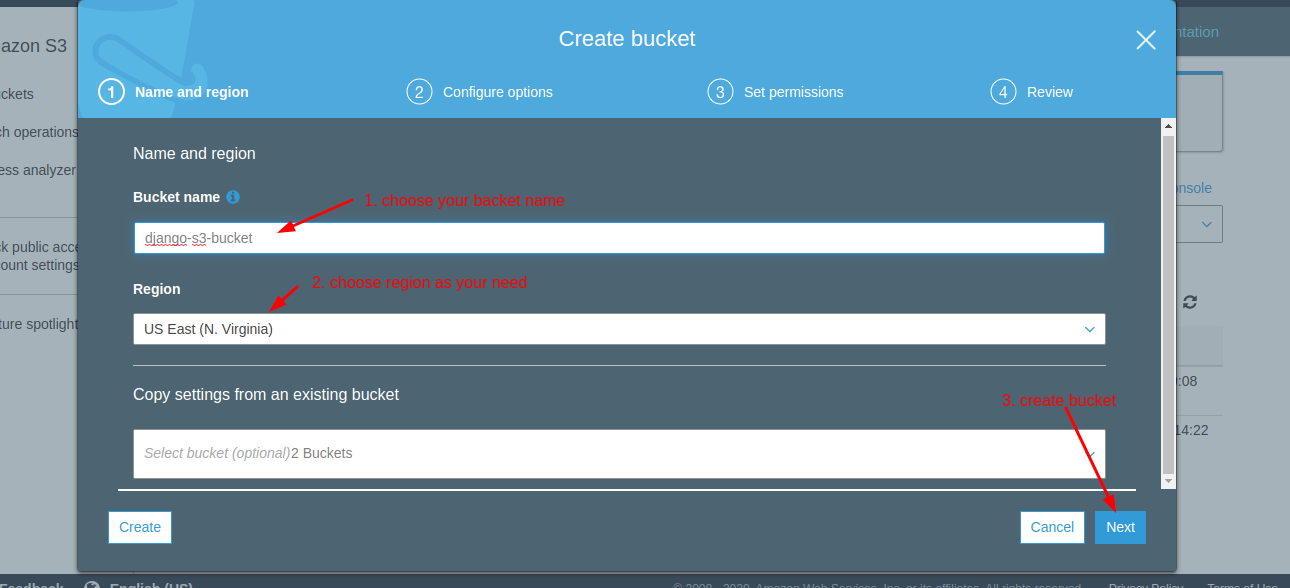
02. Select default settings for the next steps of the creation process of the bucket
03. You need to make permission of cors configuration for this bucket
<?xml version="1.0" encoding="UTF-8"?>
<CORSConfiguration xmlns="http://s3.amazonaws.com/doc/2006-03-01/">
   <CORSRule>
      <AllowedOrigin>*</AllowedOrigin>
      <AllowedMethod>GET</AllowedMethod>
      <AllowedMethod>POST</AllowedMethod>
      <AllowedMethod>PUT</AllowedMethod>
      <AllowedHeader>*</AllowedHeader>
   </CORSRule>
</CORSConfiguration>
04. You must be in your bucket and add this in cors configuration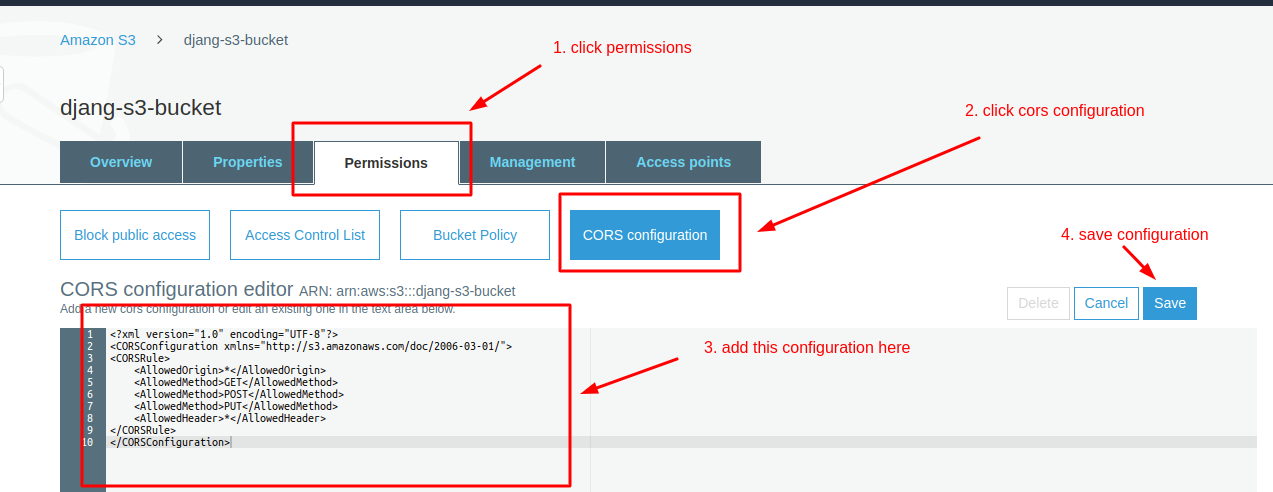
05. Create static and media folder in your bucket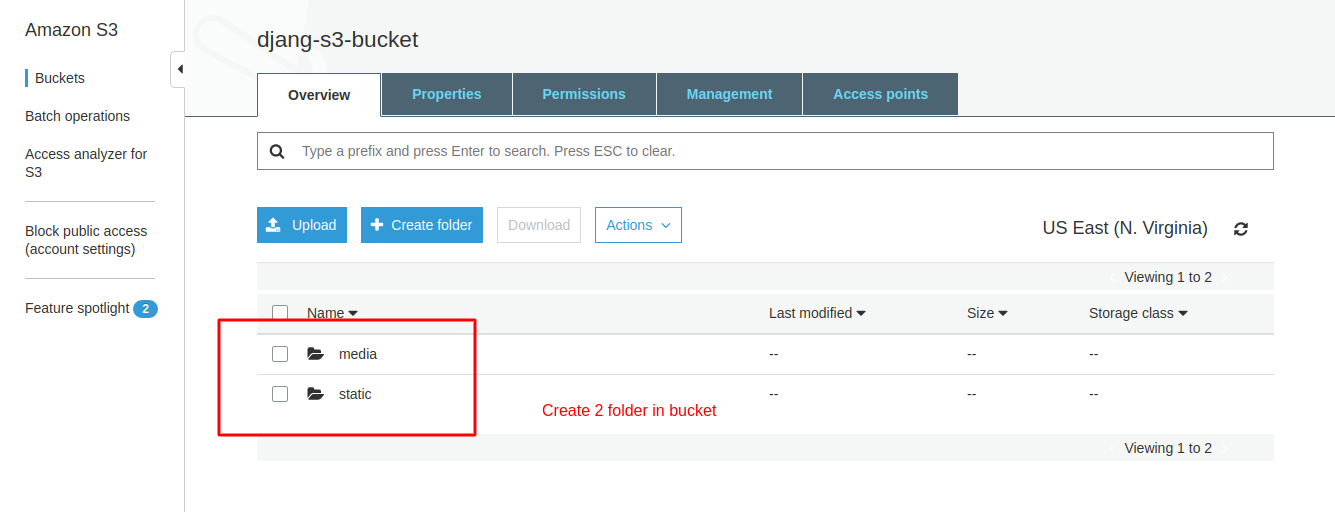
Great now you are done configuration of your bucket.
04. Add custom policy or permissions for your IAM user or group
Custom policy or permissions for Django allow uploading. delete, change files.
I am talking about manage permission or policy for this project. So we can add a policy for this user. yes, I can. but is it good? Ans: it’s not. why because if another developer wants to work on this project, he has no permissions for access or maintains s3.
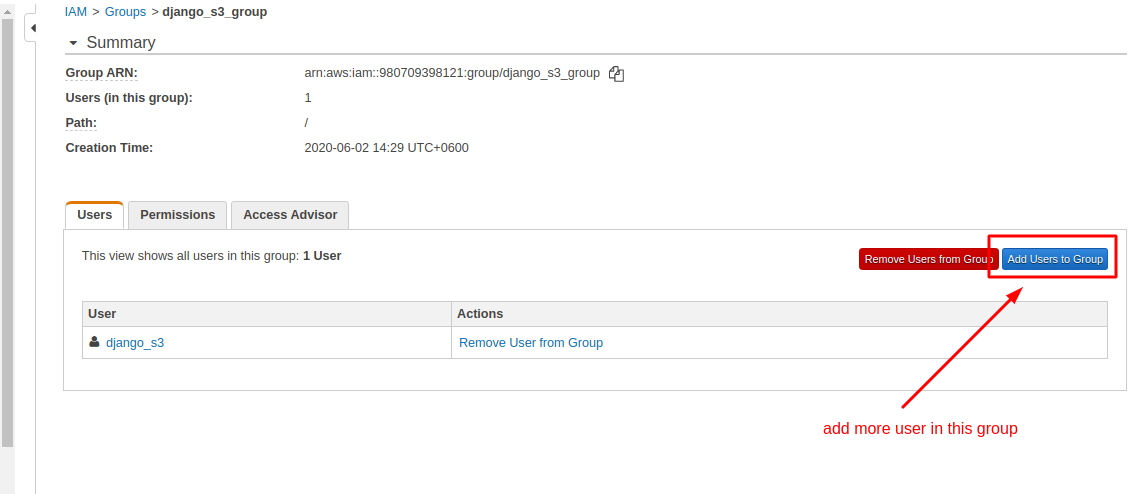
Now question is, how do permissions to access or modify this project? how to attach policy? don’t worry I will explain. We will attach a policy with the IAM Group. Why? Because if another developer wants to work on this project. he will simply add to the group.
05. We will use this policy, this policy allows us to upload, change and delete things
{
    "Version": "2012-10-17",
    "Statement": [
        {
            "Effect": "Allow",
            "Action": [
                "s3:ListAllMyBuckets"
            ],
            "Resource": "arn:aws:s3:::*"
        },
        {
            "Effect": "Allow",
            "Action": [
                "s3:ListBucket",
                "s3:GetBucketLocation",
                "s3:ListBucketMultipartUploads",
                "s3:ListBucketVersions"
            ],
            "Resource": "arn:aws:s3:::<your_bucket_name>"
        },
        {
            "Effect": "Allow",
            "Action": [
                "s3:*Object*",
                "s3:ListMultipartUploadParts",
                "s3:AbortMultipartUpload"
            ],
            "Resource": "arn:aws:s3:::/<your_bucket_name>"
        }
    ]
}
06. Selected your new policy to attach to group
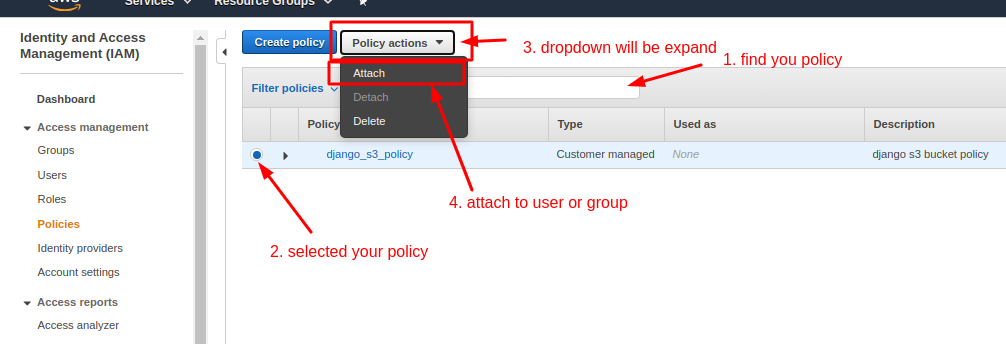
07. Now attach with group
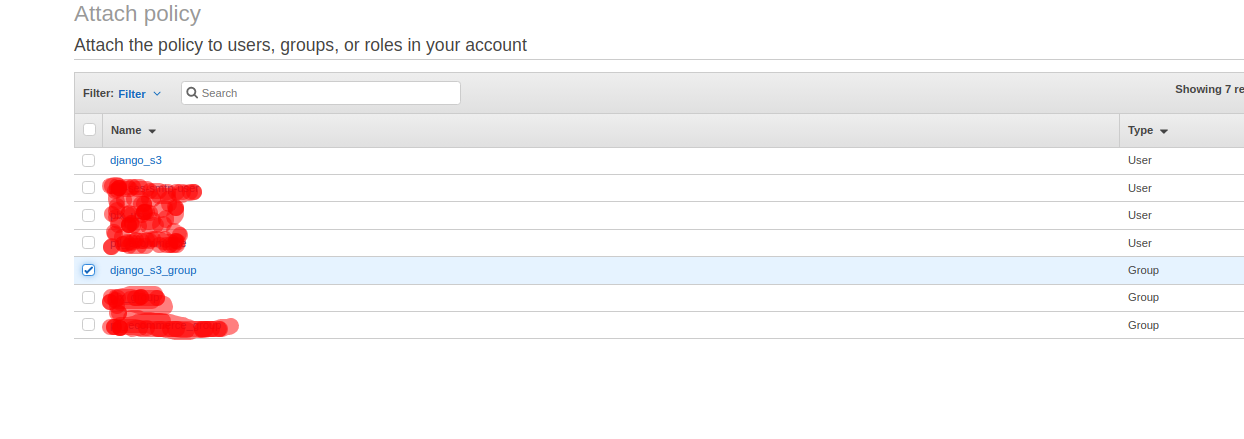
So that great. we had created IAM User, Group, S3 Bucket, and Policy or permissions for the bucket. that’s it. Now we can set up our Django application for s3.
Django s3 object storage setup
First need two packages for setup Django s3 configuration.
- boto3
boto3 is an object-oriented API client to access and manage such as AWS S3 resources and EC2. boto is an official distribution maintained by Amazon. - Django-storages
Django-storages is an open-source package to manage custom backend storage such as AWS S3, Digital Ocean, Google Cloud Storage, Apache Libclod, Azure Storage, DropBox etc.it’s make easy to use or maintain backend storage
Install two package
pip install boto3 django-storages
In settings.py update INSTALLED_APP
INSTALLED_APPS = [
    ...
    'storages',
    ...
]
Run Migrations
python manage.py migrate
Configuration for AWS
You can simply add this configuration to your settings.py file
AWS_ACCESS_KEY_ID = '<your_access_key>'
AWS_SECRET_ACCESS_KEY = '<your_secrect_key>'
AWS_STORAGE_BUCKET_NAME = '<Your_bucket_name>'
AWS_S3_CUSTOM_DOMAIN = '%s.s3.amazonaws.com' % AWS_STORAGE_BUCKET_NAME
AWS_S3_OBJECT_PARAMETERS = {
    'CacheControl': 'max-age=86400',
}
AWS_LOCATION = 'static'

STATICFILES_DIRS = [
    os.path.join(BASE_DIR, 'static'),
]

MEDIA_URL = '//%s.s3.amazonaws.com/media/' % AWS_STORAGE_BUCKET_NAME
MEDIA_ROOT = MEDIA_URL
DEFAULT_FILE_STORAGE = 'storages.backends.s3boto3.S3Boto3Storage'
STATIC_URL = 'https://%s/%s/' % (AWS_S3_CUSTOM_DOMAIN, AWS_LOCATION)
STATICFILES_STORAGE = 'storages.backends.s3boto3.S3Boto3Storage'
Collectstatic file to AWS
python manage.py collectstatic
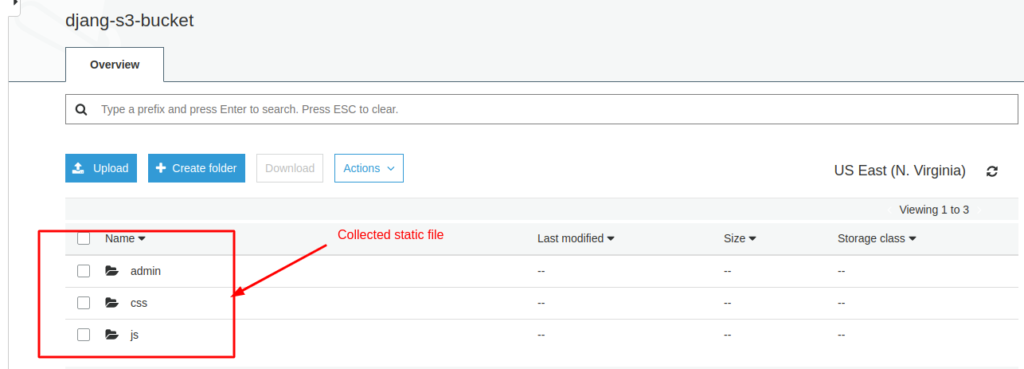
It will work. But I configure with a separate folder call AWS.
The best way to configure AWS or How I configure AWS settings with a separate folder
01. Add ‘aws’ folder in django_s3(my django_s3, your case may be different with your project name) directory.
SAJAL-ubuntu:~/Programming/test/django-s3$ tree -d
.
├── core
│   └── migrations
├── django_s3
│   └── aws   ## crated new aws Configuration folder
├── static
│   ├── css
│   ├── images
│   └── js
└── templates
02. In the django_s3 directory make three files calls “__init__.py”, “conf.py”, “utils.py”
SAJAL-ubuntu:~/Programming/test/django-s3$ tree django_s3
django_s3
├── asgi.py
├── aws
│   ├── conf.py  ## new File
│   ├── __init__.py  ## new File
│   └── utils.py  ## new File
├── __init__.py
├── settings.py
├── urls.py
└── wsgi.py
03 Add configuration in conf.py files
import datetime
import os

AWS_USERNAME = 'django_s3' # not matter
AWS_GROUP_NAME = 'django_s3_group' # not matter
# Aws config
AWS_SECRET_ACCESS_KEY = '2IF3Z/k4gni+YIl4RVIA4eOXp0ncBqFsrncqdHqf'
AWS_ACCESS_KEY_ID = 'AKIA6IVWV2ZU5HKXT2VV'
AWS_FILE_EXPIRE = 200
AWS_PRELOAD_METADATA = True
AWS_QUERYSTRING_AUTH = True
AWS_DEFAULT_ACL = None

DEFAULT_FILE_STORAGE = 'django_s3.aws.utils.MediaRootS3BotoStorage'
STATICFILES_STORAGE = 'django_s3.aws.utils.StaticRootS3BotoStorage'
AWS_STORAGE_BUCKET_NAME = 'djang-s3-bucket'
S3DIRECT_REGION = 'us-east-1'
S3_URL = '//%s.s3.amazonaws.com/' % AWS_STORAGE_BUCKET_NAME
MEDIA_ROOT = S3_URL + 'media/'
STATIC_URL = S3_URL + 'static/'
ADMIN_MEDIA_PREFIX = STATIC_URL + 'admin/'
AWS_S3_FILE_OVERWRITE = False
two_months = datetime.timedelta(days=61)
date_two_months_later = datetime.date.today() + two_months
expires = date_two_months_later.strftime("%A, %d %B %Y 20:00:00 GMT")

AWS_HEADERS = {
    'Expires': expires,
    'Cache-Control': 'max-age=%d' % (int(two_months.total_seconds()),),
}
04. Add Lambda expression for storages in utils.py file
from storages.backends.s3boto3 import S3Boto3Storage
StaticRootS3BotoStorage = lambda: S3Boto3Storage(location='static')
MediaRootS3BotoStorage  = lambda: S3Boto3Storage(location='media')
05. Add conf.py in settings.py
from django_s3.aws.conf import *
06. Great, you configured you aws s3. now final step collectstatic
python manage.py collectstatic
Get github django s3 code
Conclusion
I found the best way to set up Django AWS. in this article I explain what I set up in my real project. please comment if you have other better ways.
9 comments
very good material.
Greetings! Very helpful advice on this article! It is the little changes that make the biggest changes. Thanks a lot for sharing!
As soon as I detected this website I went on reddit to share some of the love with them.
I simply could not depart your website prior to suggesting that I really enjoyed the usual information a person provide for your visitors? Is going to be again ceaselessly in order to check out new posts
Its not my first time to pay a visit this website, i am browsing this site
dailly and obtain nice facts from here everyday.
Everything is very open with a very clear explanation of the issues. It was definitely informative. Your website is very useful. Thank you for sharing!
Appreciate you sharing, great blog article.Much thanks again. Really Great.
Spot on with this write-up, I seriously think this web site needs a lot more attention. I’ll probably be returning to
read more, thanks for the information!
Pretty! This was a really wonderful post. Many thanks for supplying this info.
Comments are closed.